Hi everyone! It’s time for our bourse class weekend 🙂
All the pictures are clickable and shall lead you to a larger view.
You can see the list of materials needed here. The most important thing is having:
- a square design, with plenty of margin around
- an outer fabric of the same size (you can take any kind you want – cotton, silk, satin, brocade, whatever)
- some ribbon or cording to gather and tie the bourse (I chose narrow lace).
1. I’m going to start with a little tip I came up with to make sure you sew a perfectly, perfectly straight line all around the design. The tip was inspired to me by a technique in garment sewing (namely, pulling a thread near the edge of a fabric to determine the grain). We are going to pull a thread from the linen on each side of the stitched piece, right where the seam shall be.
For the first side, you’ll just have to determine the seam allowance. It’s your call – I like 1cm (3/8″) for those small projects 🙂 Once you have decided this, pick up the thread in the linen right on the line where you want the seam to be. I pick it up with a seam ripper, but small pointed scissor will work, too. Do be careful to pick up just this thread. Cut it and pull it out of the linen. You will end up with a small groove, which shall be your seamline 🙂
For the other sides, you’ll first have to go back to the first side and to count the number of linen threads between the stitched design and the thread you just pulled out. Then, count the same number of threads on each side, and pull a linen thread on each side.
You will end up with this:

(Oops! The linen started fraying – but not enough to get me worried. Just handle it carefully – we’ll be trimming it in no time anyway 😉 )
Now we can really start sewing 🙂
2. Assemble the outer fabric and the stitched piece.
Pin them right sides together, with the stitched piece on top (since the groove we created in the linen will serve as a guideline)
Start sewing, starting not quite in the middle of a side. Whether you will be sewing by hand or by machine, all you have to do is sew right in the groove created by the pulled threads. Easy, non? 🙂
Go around the whole square, and stop 2-3 inches before the beginning of the seam. This will be the opening through which you’ll turn the bourse inside out. (Do not start sewing in a corner. It will be much more of a pain to slipstitch a corner than a straight line, when you close the opening!)
3. Trim the seams close to the seamline (I do it with pinking shears so that the fabric and linen won’t fray) and clip the corners. This will ensure crisp edges and corners when you turn the work inside out.
4. Turn your work inside out. Press it carefully (press, do not iron. Pressing ensures you do not distort the seamline and fabric).
Slipstitch the opening closed. (Slipstitching is explained and illustrated in the middle of this page.)
5. Creating the casings:
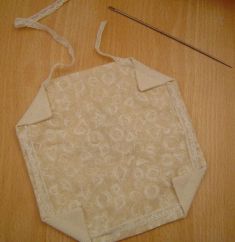
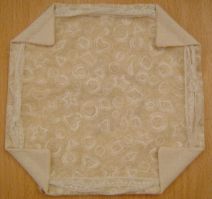
Fold the corners to the outside fabric to form isosceles triangles
Sew the corners down, stitching a line parallel to the folded edge. This creates the casing. Make sure your casing is wide enough to accommodate two widths of your ribbon/cording/narrow lace.
The stitching line is barely visible, which is a good thing 🙂
6. Insert ribbon into the casings. (I use a large knitter’s sewing needle, but anything goes).
Once the first length of ribbon/cording is threaded through the casings, make a knot to close it. To determine the length, just make sure it lies flat around the (still open) bourse.
Starting from the other side, thread the second length of ribbon/cording through the casings.
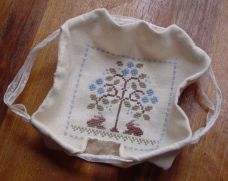
All you need to do now is to pull the ribbons in order to gather up the edges and close the bourse.
Optional: You may sew a button to each corner of the bourse, if desired.
In my case I only sewed one button on to show you, but removed it afterwards. This particular bourse is small, and I felt the buttons would overload it.
Et voilà !
Now you have a cute little bourse, to give or to keep 🙂
I hope this was clear. If not, please feel free to ask any question by posting in the comments. Again, there is never anything such as a dumb question. Ask me how I know – I’m a teacher! 😉
Also, if you make a bourse, please post a picture to the blog for everyone to enjoy 🙂
Have fun everyone! Happy bourse-ing 😉


Thank you Isabelle, this is the best bourse tutorial I have seen! 🙂
My first bourse in my to-do list, some day, when I have time… 😆
Wow, Isabelle, you are such a great instructor! I’ll be adding this to my list of new things to try! I’m sure it will become a favorite!
Merci beaucoup!
You did a great job with your bourse tutorial! Your instructions are very clear.
And thank you so much for sharing the tip of drawing a thread from the linen to sew a straight line. I sure need that tip 🙂
Great job Isabelle, very clear and exactly as I did mine :-))
Wonderful tutorial Isabelle, thank you! 🙂
Isabelle, thank you for these wonderfully clear and helpful instructions! I have never made a bourse before but fell in love with the first one I saw. I am definitely motivated to make one now. Thanks again!
Really great and clear tutorial Isabelle – thankyou
Hallo Isabelle, thank you for this clear and very easy to follow instuctions. I make the bourse this morning! How to post the photos? It seems I can’t find your email address on the blog. I also have a wordpress account (not a blog), alias “giusypatch”, so if you let me know how, I would love to share the picture of my bourse…. for the moment I can’t publish them on my own blog, because it would be a present for my best friend… and she read my blog. 😉
Ciao, Giusy (Italy)
Hi Giusy,
You’ll get all the information in those two posts:
https://focusonfinishing.wordpress.com/2007/03/25/posting-pictures/
You need to email Karen or Anne about getting posting rights on the blog, they are the blog’s administrators. I’m just a poster 🙂
Hope this helps!
Hi all, and thank you for your enthusiasm! 😀
I’m adding a question that Barbara asked in the materials post. I thought this may help others. Barbara was asking what difference there is between pressing and ironing. The answer is here. 🙂
Have a fun weekend everyone! Looking forward to seeing your beautiful bourses 🙂
Hello Isabelle !
Je viens d’imprimer ton cours, ce matin je suis allée choisir deux tissus (parce que je n’ai pas de broderie sous la main …) et cette après-midi je me lance dans la fabrication ! Tes explications et tes photos sont parfaitement claires, j’espère ne pas faire honte à la professeuse …
Merci beaucoup !
PS : bien sûr, comme nyl n’est parfait, j’ai oublié les rubans …
Merci Marianne ! Tu es adorable 🙂
thankx a lot sweety for this tutorial 🙂 i like the idea of removing one thread in order to make a straight sewing…nice tip….:)
bsious
Great instructions-they were so clear and so easy to follow. I am going to try this. Thanks Isabelle.
What a great tutorial Isabelle–thank you so much. The pictures and instructions are very clear. I just finished stitching my piece and now I am going to attempt to make the bourse using your instructions. 😀
Thank you so much Isabelle. I had a lot of fun making my bourse and it turned out beautifully. Your instructions and pics were clear and easy to follow. 😀
Thanks Isabelle, your tip on making the channel for stitching is most excellent – I have just used this tip in making maddi’s sewing bag and I will for my next bourse too.
THANK you 🙂
Thanks so much for the instructions! I do have a question though….is there a minimum size suggested for making a bourse? I just finished a piece that I’d like to make one out of but am worried it would be too small.
Hi Jennifer! What are your piece’s measurements? Notions of smallness are somewhat relative, so it would help me in order to reply to your question properly. 🙂
If you fear the linen may be too small you can sew strips of fabric around 🙂
Thank you for your great tutorial!!! Today is the first time I’ve seen such a thing as bourse. We have no such a thing here in Russia. We had no samplers, biscornus, it came here not long ago thru english-speaking cross stitch communities.
I wonder, what is use for bourse? Well, I’am smart enough to guess it can be used to keep threads for current project or pinkeeper with pins… But what was it’s use in the first place?
Pingback: Annette’s Acre » As Promised….You Were Hatched
Pingback: Quaker Alphabet Exchange for Aniza. « They came from the LNS…
What a great tutorial! I’m getting idea’s for my small finished projects that have been sitting around unframed with nothing to do with them
Thanks!
Thanks for the excellent tute! I’ve got ideas for Christmas presents now, I just need the TIME to stitch something nice 🙂
Isabelle – A wonderful tutorial! As I was making it up, I used another tip from a sewing book that helps with the slip-stitching. After the seams are stitched (step 3) and before you turn it (step 4), press open the seam that has the opening in it – then press both sides of the seam back together and turn the bourse. Pressing the seam open created the edge of a fold on each of sides that will be slip-stitched together. This makes the opening edges line up perfectly with the seams around the opening and it’s much faster to stitch closed. Since I do most of my finishing at the last minute and late at night, I need all the help I can get! Thanks for your wonderful directions! Pat
What a wonderful tutorial! I can do this!! Thank you ! I think your bourse looks wonderful with the button 🙂
SO … Thank you Mama Joan for sending the link!
Happy Stitching!
fantastic! I followed your tutorial for my first bourse and it was so simple! Thanks 🙂
thank you Isabelle for this wonderfully clear tutorial, I’m certainly going to try to make one now 🙂
It’s a very great tutorial! Thank you… I’m going to try… It looks so simple!
Thanks everyone! I am glad this is still helpful. 🙂
Waoo ! this is SO nice !!!
thanks a lot for this great tutorial !!!!!
I will moste likely use it to create a little bride-purse for my friend who is getting married this summer :-)))
you made my day !
Queoriginal bolsito creo que lo convertire en costurero para regalarles a mis hijas.
cariños
ana
Hi have looked and looked to find instructions for these lovely little pouches and thank you so much for such clear instructions.
Ellie